
What if your daily ritual began not in a functional room, but within a curated escape that mirrors the quiet elegance of a five-star retreat? You likely believe that a beautiful vanity is the anchor of this sanctuary, yet you might be unsure about how to install a bathroom vanity amidst the complexities of HDB plumbing and reinforced concrete walls. It's natural to feel a sense of hesitation when facing the technical nuances of your home's architecture. We understand the desire for a space that feels both effortless and enduring.
We've designed this sophisticated guide to help you achieve the precision of a master craftsman, ensuring your transition to luxury is both seamless and secure. You'll master the art of creating a space that breathes serenity while maintaining the highest standards of functionality. We'll walk you through demystifying the choice between S-traps and P-traps, securing your cabinet against the unique demands of Singaporean masonry, and achieving a leak-free finish that protects your investment for years to come.
Key Takeaways
- Curate a professional-grade toolkit and prepare your HDB space to ensure a seamless transition to a more refined sanctuary.
- Master the sophisticated process of how to install a bathroom vanity with precision, focusing on balanced symmetry and structural integrity.
- Learn the secret to a "crafted for life" aesthetic through meticulous leveling and shimming techniques tailored for Singaporean homes.
- Discover the nuances of integrating undermount or vessel basins to create a harmonious, organic form within your vanity setup.
- Refine your daily ritual by mastering final adjustments for smooth, silent operation and a restored sense of bathroom serenity.
Preparing Your Sanctuary: Pre-Installation Planning and Tools
Your morning ritual begins at the vanity. It's the silent anchor of your personal sanctuary. When you understand how to install a bathroom vanity with precision, you create a foundation for daily tranquility. A well-installed cabinet does more than hold a basin; it harmonizes the room. It hides the chaos of plumbing and offers a clean, minimalist surface for your self-care essentials. To truly appreciate the craftsmanship required, exploring Bathroom Cabinets Explained provides historical context on how these pieces evolved from simple storage to modern design centerpieces. Preparation is the bridge between a functional room and a refined retreat.
The Essential Tools for a Flawless Finish
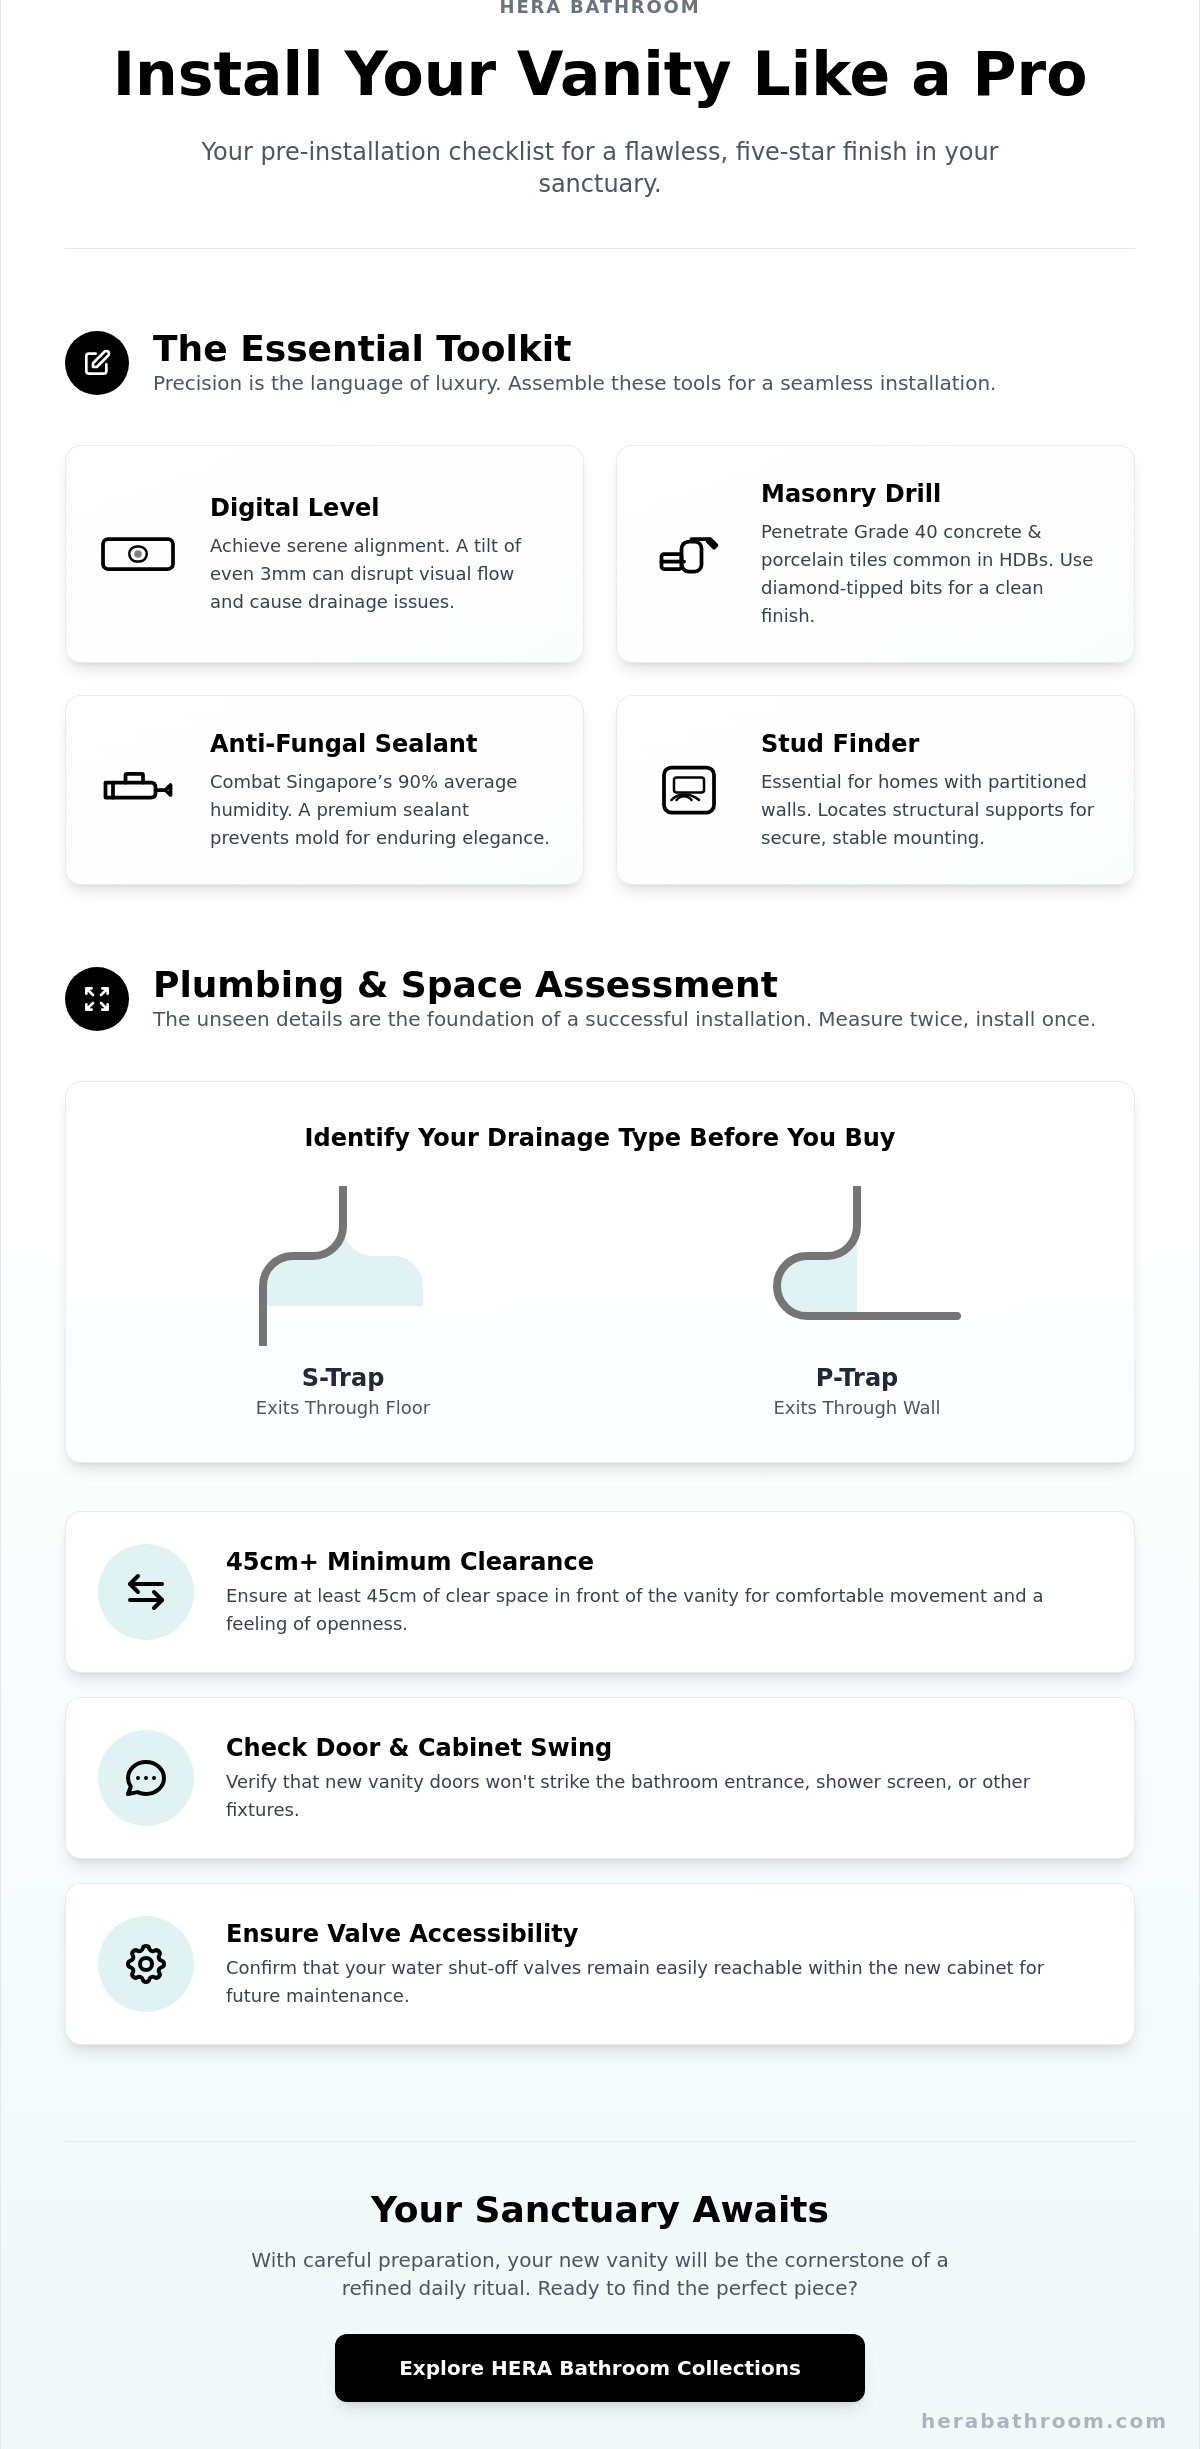
Precision is the language of luxury. A digital level is vital for the serene alignment of your cabinet. Even a three millimeter tilt can disrupt the visual flow of your tiles and cause drainage issues. For Singaporean homes, your toolkit must account for structural reality. Most HDB walls are constructed with high-strength Grade 40 concrete or finished with heavy porcelain tiles. You'll need specialized diamond-tipped or carbide drill bits to ensure clean entry without cracking the surface. Finish your work with high-grade anti-fungal silicone. In Singapore’s 90% average humidity, a premium sealant prevents the unrefined look of mold growth, maintaining your sanctuary's elegance for years.
- Digital Level: Ensures a perfectly horizontal surface for the basin.
- Masonry Drill: Essential for penetrating reinforced concrete walls.
- Anti-Fungal Sealant: Protects the edges from tropical moisture.
- Stud Finder: Locates structural supports in partitioned walls.
Plumbing and Space Assessment
Success in learning how to install a bathroom vanity lies in the details you cannot see. Singaporean plumbing typically follows two paths: the S-trap, which exits through the floor, or the P-trap, which exits through the wall. You must identify your drainage type before selecting a cabinet. A mismatch here requires costly plumbing alterations that disrupt your timeline. Check the accessibility of your shut-off valves. These should remain reachable within the new cabinet structure for future maintenance.
Measure your "sanctuary footprint" with absolute care. In compact HDB layouts, every centimeter matters. You must ensure at least 45 centimeters of clearance in front of the vanity for comfortable movement. Check that the cabinet doors won't strike your shower glass or the bathroom entrance. Before committing to a specific layout, consult the HERA Brochures to cross-reference specific model dimensions with your existing floor plan. This step ensures your chosen piece fits with the effortless grace your home deserves.
Transitioning the Space: Removing the Old and Wall Readiness
The journey toward a refined sanctuary begins with a quiet clearing of the old. Before you can welcome the elegance of a new HERA fixture, you must release the past with intention. This stage of learning how to install a bathroom vanity is less about demolition and more about preparation. It's the moment you reclaim your space and prepare the canvas for a new level of sophisticated self-care.
Safe Disconnection and Removal
Begin by closing the water supply valves. It's a simple act that ensures the tranquility of your home remains undisturbed by unexpected leaks. Place a shallow basin beneath the P-trap to catch any residual water as you loosen the nuts. This prevents messy spills on your bathroom floor and keeps the environment calm. Once the plumbing is free, use a utility knife to gently score the caulk line where the old cabinet meets the wall. This small, precise movement protects your tiles from chips or tears, preserving the integrity of your existing finishes.
In Singapore, managing the disposal of your old materials requires mindfulness of estate regulations. Most HDB Town Councils offer a bulky item removal service, which is often free for the first few items each month. If you're in a private condominium, check with your Management Corporation Strata Title (MCST) regarding designated disposal areas and timing. Keeping the common corridors clear is essential for maintaining harmony with your neighbors during your renovation.
Preparing the Wall Surface
With the old unit gone, your wall becomes a blank canvas. Scrape away any lingering adhesive or silicone residue until the surface is perfectly flush. This ensures your new cabinet sits with the poise it deserves. Many HDB walls, particularly in older estates, aren't perfectly straight. Use a spirit level to check for plumbness. If the wall leans slightly, you'll need to plan for shims to ensure your HERA vanity remains perfectly level. This attention to detail prevents future drainage issues and ensures the sleek lines of your basin remain undisturbed.
For those choosing a floating aesthetic, this This Old House guide to wall-mount vanities offers excellent structural insights that complement your project. You'll need to locate the studs behind the wall for a secure mount. If your bathroom features solid masonry or brick, which is common in Singaporean construction, high-quality heavy-duty wall plugs are essential. These provide the structural strength needed to support the weight of a premium stone top. For more inspiration on optimizing your layout before the final mount, explore our bathroom vanity cabinet collection.
A well-prepared foundation is the secret to a timeless installation. Take the time to mark your drill points with precision, ensuring they align with the internal support brackets of your new fixture. When the wall is ready, the rest of the how to install a bathroom vanity process flows with effortless grace. You're now ready to bring your vision of a personal retreat to life.
Seeking the perfect balance of form and function for your renovation? Discover how a bespoke vanity can transform your daily routine into a ritual of serenity.
The Art of Placement: Securing Your Vanity Cabinet with Precision
Creating a personal sanctuary begins with the physical foundation of your design. When you learn how to install a bathroom vanity, the placement phase is where your vision takes a tangible, permanent form. A vanity that sits even a few millimeters off-center disrupts the visual harmony of the entire room. Achieving a balanced, symmetrical aesthetic requires more than a simple eye-test; it demands a commitment to exact measurements and a deep appreciation for architectural alignment.
Before any drilling begins, dry-fit the cabinet against the wall. This allows you to visualize the flow of the space and ensure the plumbing lines align perfectly with the cabinet’s internal cutouts. In a minimalist retreat, every line must be intentional. Centering the unit relative to the wall or the overhead lighting creates a sense of order and tranquility. This stage is about more than utility. It is about crafting a space that feels curated for life.
Achieving Perfect Level and Alignment
A flawless finish relies on a perfectly level surface. Most bathroom floors in Singapore have a slight fall for drainage, which can complicate the installation of floor-standing units. You must use shims discreetly to maintain the sleek, minimalist look of your HERA vanity. These small wedges compensate for floor irregularities without compromising the unit's silhouette.
The double-check method is your best tool for success. Place your spirit level across the width of the cabinet, then repeat the process from front to back. If the bubble isn't perfectly centered on both axes, the cabinet door hinges may eventually sag or the countertop may not seal correctly. Once level, mark your mounting holes with surgical precision using a pencil. This ensures that the structural weight is distributed evenly across the wall. This step is the secret to a vanity that feels solid and timeless.
Securing to Singaporean Walls
Most Singaporean homes, particularly HDB BTO flats and newer condominiums, utilize reinforced concrete or brick walls. These surfaces offer incredible stability but require specific hardware for a secure fit. Standard plastic wall plugs are often insufficient for heavy bathroom furniture, especially for wall-hung styles that lack floor support. For a 60cm to 90cm floating cabinet, use heavy-duty nylon expansion plugs or M8 shield anchors to ensure structural integrity.
- Drilling through tiles: Use a specialized diamond-tipped or carbide masonry bit. High-speed drilling generates heat that cracks porcelain. Use a slow-speed, high-pressure technique to bite into the glaze safely.
- Taping the mark: Place a piece of masking tape over your drill mark. This prevents the drill bit from wandering and protects the surrounding tile surface.
- Final torque: Tighten the mounting bolts until the cabinet is flush against the wall. Avoid over-tightening, as excessive force can stress the cabinet frame or crack the tile behind it.
Securing the unit with confidence transforms a simple renovation project into an act of design. When you understand how to install a bathroom vanity with these technical nuances, you ensure your sanctuary remains a place of beauty and safety for years to come.
Functional Elegance: Installing the Vanity Top, Basin, and Plumbing
The vanity top is the crowning jewel of your retreat. It brings a sense of organic form to the space, bridging the gap between bespoke cabinetry and the daily ritual of cleansing. When you learn how to install a bathroom vanity, you realize that the marriage of these components requires a delicate touch. It's about more than just alignment; it's about creating a unified, serene structure that feels like it has always belonged in your home.
Setting the Vanity Top and Basin
Begin by applying precise beads of high-quality silicone adhesive along the top edge of the cabinet. These beads provide a secure, rattle-free bond that absorbs the subtle vibrations of daily use. Carefully lower the top into place. Centering your bathroom basin is vital for visual harmony. Whether you choose a sleek undermount for a minimalist look or a vessel sink for sculptural impact, the placement must be intentional.
In Singapore's humid climate, curing times are non-negotiable. Allow the adhesive to set for at least 24 hours before introducing weight or water. This patience ensures a flawless finish that resists the test of time. A rushed installation often leads to microscopic shifts that disrupt the clean lines of your sanctuary.
Plumbing Connections and Leak Testing
Connecting the plumbing is where the art of water truly begins. Install your water tap with the correct washers, ensuring each seal is snug but not over-tightened. Precision here prevents the quiet annoyance of a slow drip. Connect the P-trap or S-trap to the wall waste outlet, ensuring the angles allow for effortless drainage. This stage of how to install a bathroom vanity requires a focus on the invisible details that support your daily comfort.
To verify the integrity of your work, use the "Paper Towel Test." Wrap a single, dry paper towel around every connection point and joint. Run the water at full pressure for 120 seconds. If the towel remains crisp and dry, your plumbing is secure. Even a single damp spot indicates a need for adjustment. This refined method catches microscopic leaks before they can compromise your cabinetry.
The final step is the perimeter seal. Apply a thin, elegant bead of silicone where the vanity top meets the wall. This creates a watertight sanctuary, protecting your investment from moisture and completing the aesthetic transition. It's a small detail that defines the professional quality of your retreat.
Discover the perfect centerpiece for your personal retreat by exploring our curated collection of elegant bathroom vanities.
Refining the Experience: Final Adjustments and Maintenance
The physical labor of learning how to install a bathroom vanity concludes with the finer details. This stage is where your functional space transforms into a private retreat. Silence and precision define true luxury. Once the plumbing is secure and the sealant has cured for 24 hours, you can focus on the tactile elements that create a spa-like atmosphere.
Perfecting the Mechanics
Soft-close hinges require a delicate touch to achieve that premium feel. Use a screwdriver to adjust the tension screws on the hinge plate. Small turns will align the doors until they sit perfectly flush with a consistent 2mm gap. This creates the clean, minimalist lines essential for a modern sanctuary. Check the drawer glides for any debris or sawdust left over from the installation. A quick vacuum of the tracks ensures the drawers move with effortless grace. Align your handle hardware using a laser level or a dedicated template. Even a slight tilt can disrupt the visual harmony of your bespoke cabinet.
Caring for Your Sanctuary
Your choice of materials dictates your long-term maintenance ritual. In Singapore's high humidity, which often exceeds 80%, choosing the right care products is vital for longevity.
- Solid Wood: Use a damp microfiber cloth. Avoid harsh chemicals that strip the natural oils.
- PVC and Laminates: These are resilient against moisture. A mild, pH-neutral soap keeps the finish vibrant.
- Stone Tops: Seal your natural stone annually to prevent water spots and staining from cosmetics.
Maintaining the pristine condition of your vanity is simple with the right habits. Wipe away standing water immediately to prevent mineral buildup. You can ensure your peace of mind by adhering to the care guidelines outlined in the HERA extended warranty. Proper maintenance preserves the timeless elegance of your investment for years to come.
Knowing when to call a professional is a sign of a wise homeowner. If you encounter persistent leaks from the P-trap or if the vanity feels unstable against the wall, seek expert assistance. A licensed plumber can resolve complex drainage issues that might compromise your flooring. Safety and structural integrity are the foundations of a peaceful home.
Your journey to a more beautiful home doesn't have to end here. For more design inspiration and to feel the quality of our crafted collections, we invite you to visit the HERA Concept Store. Discover how the right details can elevate your daily routine into an act of self-care.
Embrace Your New Morning Ritual
Your bathroom transformation begins with a vision and ends with a space that breathes serenity. By mastering the fundamentals of how to install a bathroom vanity, you've moved beyond simple renovation into the art of curation. Success lies in the meticulous preparation of your HDB or BTO walls and the precise alignment of the basin and plumbing. These steps ensure your sanctuary remains functional and flawless for years to come. Every measurement taken and every seal applied brings you closer to a home that reflects your personal peace.
Quality matters in every detail. We've earned 5-star customer reviews on Facebook by focusing on premium craftsmanship and materials specifically tailored for Singapore living spaces. Your journey to a more mindful lifestyle starts with choosing pieces that inspire harmony and stand the test of time. It's time to step into a retreat that's been crafted with your well-being in mind. Design that inspires is finally within your reach.
Explore our curated collection of elegant vanity cabinets to find your perfect sanctuary piece. You're ready to enjoy a retreat that's truly your own.
Frequently Asked Questions
Can I install a vanity cabinet by myself in an HDB flat?
Yes, you can install a vanity cabinet yourself in an HDB flat if the work doesn't involve relocating structural pipes. Most homeowners successfully manage the assembly of a bespoke unit to enhance their sanctuary's elegance. According to HDB renovation guidelines updated in 2023, simple replacements of bathroom fittings don't require a permit. Just ensure your DIY project maintains the room's structural integrity and aesthetic balance.
How high should a bathroom vanity be installed for optimal comfort?
A standard height of 85 to 90 centimeters provides the most ergonomic experience for adults. When learning how to install a bathroom vanity, positioning it at this level ensures your daily rituals remain effortless and graceful. This height aligns with contemporary design standards, offering a seamless transition from the basin to your touch. It creates a refined silhouette that complements the serene atmosphere of your private retreat.
What is the best sealant to use for a bathroom vanity in Singapore?
A high-quality, 100% silicone sealant with anti-fungal properties is essential for Singapore's 80% average humidity. Products like Selleys Wet Area Silicone are crafted to resist mold growth and maintain a flawless finish. This choice ensures the longevity of your sanctuary by preventing water damage behind your elegant cabinet. A clear or white finish provides a minimalist look that preserves the harmony of your space.
Do I need a permit to change my bathroom vanity in a BTO flat?
You don't need a formal HDB permit to replace a bathroom vanity in a BTO flat. However, if your flat is within the first 3 years of completion, be careful not to damage the original waterproofing layer. HDB's 2024 renovation handbook states that replacing internal fittings is allowed. Always ensure the new unit doesn't exceed the floor's weight capacity to maintain your home's safety and serenity.
How do I drill into bathroom tiles without cracking them?
Using a diamond-tipped drill bit at a low speed is the most effective way to protect your tiles. Apply a piece of masking tape to the surface to provide traction and prevent the drill from wandering. This meticulous approach ensures the flawless finish of your walls remains intact. For the best results, keep the bit cool with a small amount of water to avoid heat-related cracks during the process.
Should I caulk around the bottom of a floor-standing vanity?
Caulking the base of your floor-standing unit is vital for maintaining a hygienic and timeless sanctuary. It prevents moisture from pooling under the cabinet, which can lead to unpleasant odors or mold. This small detail ensures your spa-like retreat remains pristine and well-maintained over the years. Use a thin bead of silicone to create a clean, minimalist line that blends perfectly with your floor tiles.
What is the difference between a P-trap and an S-trap for my vanity?
The primary difference lies in the exit point of the waste pipe; P-traps connect to the wall while S-traps lead into the floor. Most modern Singaporean apartments use P-traps to maximize storage space beneath the basin. Understanding this distinction is a key step in how to install a bathroom vanity correctly. Choosing the right trap ensures a smooth flow of water and maintains the quiet confidence of your plumbing system.